Controlling an USB camera from a Raspberry Pi, and doing some image magic! (Part1)
The Raspberry Pi is a fantastic piece of equipment, and what I like the most is that it resembles a standard computer with Ubuntu, just with a little less memory and a bit slower CPU. The rest is almost identical. But foremost, it is SMALL, only needs power from a regular USB cable. It comes with both Ethernet and Wifi, and you login using SSH. What more can you need?
However why would you need such a small and slow computer? To control other small devices of course!
I have experimented with all kinds of external equipment, including an electrical relay that could control 220V on/off to whatever appliances you have.
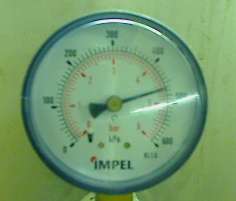
The most common add-on is however a camera. And since RPI is compatible with most cheap USB cams, I decided to start this little project where I let a RPI monitor the pressure gauge on my water hydrophore. I wanted to see whether the hydrophore lost pressure over time, indicating a leak somewhere. Also, I wanted an excuse to do this camera-image-hacking.
I started with setting up a RPI in the garage, with an attached Logitech QuickCam Pro 9000 USB web camera that I had laying around. The camera is supported by the Raspbian OS so I didn’t need to do anything in particular, except adding my user (alpha) to the video group. Then I don’t have to run my scripts using sudo every time.
Using lsusb I could see:
Bus 001 Device 004: ID 046d:0990 Logitech, Inc. QuickCam Pro 9000
Bus 001 Device 003: ID 0424:ec00 Standard Microsystems Corp. SMSC9512/9514 Fast Ethernet Adapter
Bus 001 Device 002: ID 0424:9514 Standard Microsystems Corp.
Bus 001 Device 001: ID 1d6b:0002 Linux Foundation 2.0 root hub
And using dmesg showed me:
alpha@pi2:~ $ dmesg | grep video
[ 3.731610] Linux video capture interface: v2.00
[ 3.785453] uvcvideo: Found UVC 1.00 device  (046d:0990)
[ 3.816595] usbcore: registered new interface driver uvcvideo
And with the device /dev/video0 available, I saw that everything looked OK.
next, I started too look for a suitable library that could help me get screenshots. My general idea was that I should
- Get a snapshot
- Save it to file
- Do some image wizardry to the file, maybe make it black and white and remove noise?
- Somehow decode and find the “pointer” of the gauge to see where it was pointing. This is the hard part I assume…
- Act on the info
- Rinse and Repeat
After some searching, I found the pygame framework, which seems to have a Camera module. The problem was that it was…. Python. I have never done anything in Python. But, how hard can it be? Not very hard at all it turned out!
With my Raspbian Jesse, I had Python 2.4.7 installed. I then learned that I needed something called “pip”, which is a packet manager for Python.
(Much later I learned that there exists a neat version manager called pyenv – similar to rbenv and rvm for ruby – that can help you have multiple versions of python installed, but you don’t need to know that now)
I found a simple example that opens the /dev/video0 using pygame, takes a snapshot and saves the file, then closes the camera.
It felt like I was halfway there… but then for some reason I thought I whould update Python to the latest version, 3.4.8, and that got me sidetracked for a day.
Basically the problems was that newer Pythons (and newer versions of Pip) requires an update to the SSL-library that is used by almost everything on the Raspberry. I won’t go into details, but it was a learning experience.
It was also hard to install “older” Python versions (2.X)… but why install an older version? Well maybe you have a great example program written for 2.X, and since Python has changed ALOT between 2.X and 3.X (many coding practices are deprecated) you CAN’T run it under 3.X. So you might want several separate version of Python installed and use “pyenv”. I believe this is called virtual environments.
Anyway, now I have pyenv, and 2 Python releases (“system” and 3.4.8), the latest Pip and everything is working A-OK!
I’m still using Raspbian “Jesse”, although I hear there exists a new version “Stretch”.
A simple code piece that takes one snapshot from the USB camera looks like:
import pygame
import pygame.camera
from pygame.locals import *

# Pillow is backwards compatible with (the dead project) PIL
from PIL import Image, ImageFont, ImageDraw

pygame.init()
pygame.camera.init()
camlist = pygame.camera.list_cameras()
cam = pygame.camera.Camera("/dev/video0", (width,height))
cam.start()

image = cam.get_image()
# Will create a filename like "SNAP-20180730-121023.png"
name = 'SNAP-{date:%Y%m%d-%H%M%S}.png'.format( date=datetime.datetime.now())
pygame.image.save(image, name)

cam.stop()
I immediately added the package Pillow, which is a newer/better version of the dead package PIL, and completely replaces the latter. In fact, you MUST remove PIL before installing Pillow. And you still import methods from Module PIL….
So with Pillow, I could add some text to the Image before saving it. The PIL code to add some text looks like:
#opening snapshot
image = Image.open(name).convert('RGBA')

# make a blank image for the text, initialized to transparent text color
txt = Image.new('RGBA', (1280,1024), (255,255,255,0))

# get a drawing context
d = ImageDraw.Draw(txt)
# draw text, half opacity
d.text((10,10), "{date:%Y%m%d-%H%M%S}".format( date=datetime.datetime.now()),
                                               font=fnt, fill=(255,255,255,128))
# merging layers
image = Image.alpha_composite(image, txt)

# save merged image
image.save(name)
Take note that pygames’ “image” is not the same as PILs’ image class!
Part 2 will deal with movement and maybe some facial detection!